其实UIToolKit在Unity上测试有一段时间了,只不过一直没有机会用,最近刚好需要写一个小Demo,就在这个Demo里用UIToolKit试试水,看看未来的UI框架什么样,这里记录一下使用的方法与心得。
安装
打开PackageManager,Window-PackageManager。然后选择左上方的加号。
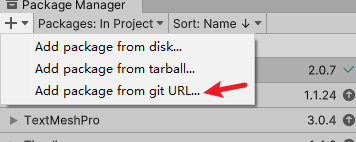
选择”Add From Git Url…“,并输入com.unity.ui,等一段时间就下好了。
同时还需要配套安装UIBuilder,是Unity官方开发的可视化编辑工具,安装方法同上,只不过输入换成com.unity.ui.builder。
等读条结束,如果没有报错,那恭喜你,安装完成了。
否则就还需要处理一些报错,这说明这个库里的一些函数调用和你目前Unity版本的接口不配套,需要具体情况具体分析。
我属于第二种情况,我遇到了两个报错,分别是:
‘FontEngine’ does not contain a definition for ‘TryGetSystemFontReference’
看了代码后发现我的FontEngine里并没有”TryGetSystemFontReference”这个函数,可能是版本不对,也可能少了什么包,不过看了一下它的调用逻辑,想了一个简单粗暴的办法,那就是注掉它……目测影响不大,至少目前还没遇到什么大问题(后面最多也就是某个字体找不到),修改后的代码如下:
public static FontAsset CreateFontAsset(string familyName, string styleName, int pointSize = 90)
{
    // 这段注掉
    //if (FontEngine.TryGetSystemFontReference(familyName, styleName, out FontReference fontRef))
        // 这里把原本传进去的变量改成常量
        return CreateFontAsset("", 0, pointSize, 9, GlyphRenderMode.SDFAA, 1024, 1024);

    Debug.Log("Unable to find a font file with the specified Family Name [" + familyName + "] and Style [" + styleName + "].");

    return null;
}

static FontAsset CreateFontAsset(string fontFilePath, int faceIndex, int samplingPointSize, int atlasPadding, GlyphRenderMode renderMode, int atlasWidth, int atlasHeight, AtlasPopulationMode atlasPopulationMode = AtlasPopulationMode.DynamicOS, bool enableMultiAtlasSupport = true)
{
    // 这几行全部注掉
    // Load Font Face
    //if (FontEngine.LoadFontFace(fontFilePath, samplingPointSize, faceIndex) != FontEngineError.Success)
    //{
    //    Debug.Log("Unable to load font face for [" + fontFilePath + "].");
    //    return null;
    //}

    return CreateFontAssetInstance(null, atlasPadding, renderMode, atlasWidth, atlasHeight, atlasPopulationMode, enableMultiAtlasSupport);
}
FontAsset.cs(985,67): error CS1503: Argument 2: cannot convert from ‘string’ to ‘int’
也是接口不适配的问题,简单粗暴一点直接改代码
// 把原来的传三个参改成传两个就好了(可能会导致找不到对应的文件,如果出现了的话就在这里拼接一下路径)
FontEngine.LoadFontFace(m_FaceInfo.familyName, m_FaceInfo.pointSize)
如果改完后经过Unity编译发现文件还原了不要慌,回到VS按下Ctrl+Z然后再保存就好了。
HelloWorld
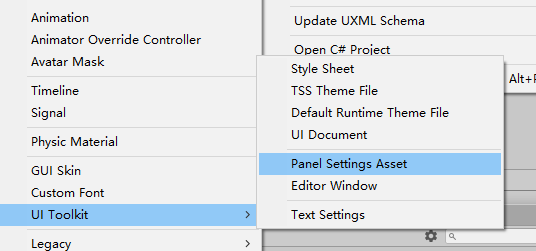
1.要使用UIToolKit,首先需要创建一个配置文件在Assets下通过Create-UI Toolkit-PanelSettingAsset创建:
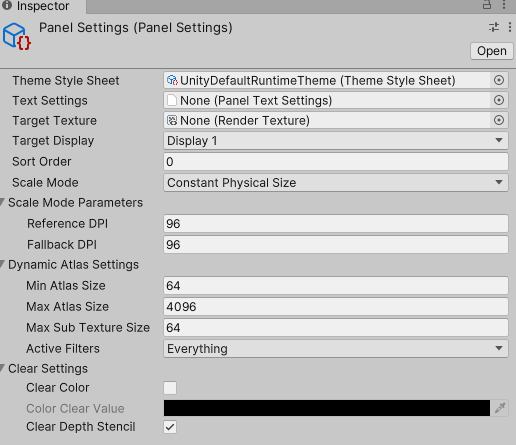
可以看到有很多参数,暂且不去管它,以后再说。
2.在Assets下创建一个UXML文件,Assets-Create-UIToolkit-UIDocument,随后打开Window-UIToolkit-UIBuilder可视化编辑工具。可以看到如下界面:
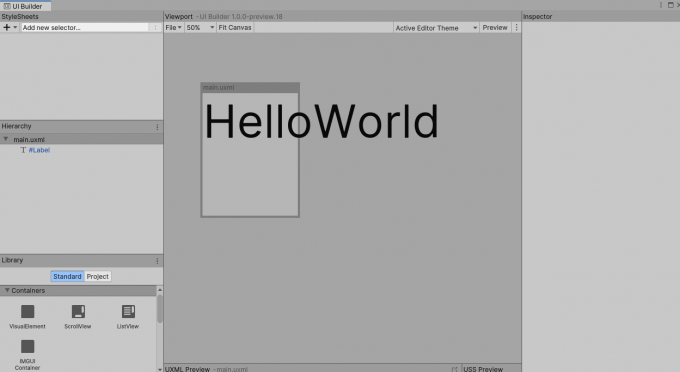
3.可以看到左下角有一些定义好的组件,找到Label拖到中间的画布上,可以看到Label已经创建完成了。
p.s 熟悉安卓开发的对这个UE一定不陌生,这简直就是安卓早期UI编辑的翻版…
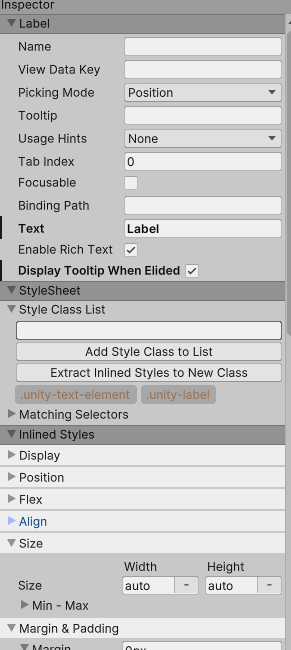
4.选中那个label可以看到最右侧的Inspector上有很多参数,找到Text参数,修改为HelloWorld。
5.在场景中新建一个GameObject,命名为UI,添加UIDocument组件。将前面创建好的配置文件PanelSetting和UXML文件拖上去。
现在,不出意外的话在Game视图已经可以看到UI了。可以去UXML里修改Label的一些参数看看UI上对应的变化。
参考资料
UI系统对比 https://docs.unity3d.com/cn/2021.2/Manual/UI-system-compare.html
UnitePPT https://www.slideshare.net/unity3d/built-for-performance-the-uielements-renderer-unite-copenhagen-2019
UIBuilder https://blog.csdn.net/qq_43500611/article/details/103063434?spm=1001.2101.3001.6650.9&utm_medium=distribute.pc_relevant.none-task-blog-2%7Edefault%7EBlogCommendFromBaidu%7ERate-9.pc_relevant_paycolumn_v3&depth_1-utm_source=distribute.pc_relevant.none-task-blog-2%7Edefault%7EBlogCommendFromBaidu%7ERate-9.pc_relevant_paycolumn_v3&utm_relevant_index=11